20220419 - 카카오 지도 API 사용하기

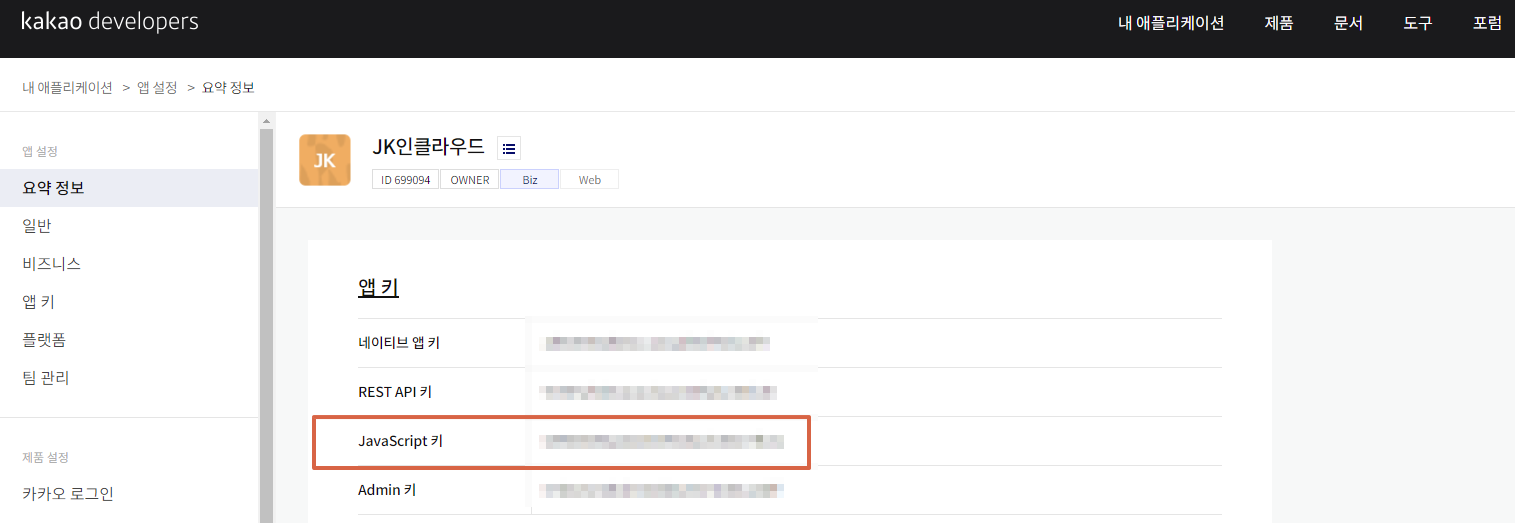
1. API KEY 받기 (https://apis.map.kakao.com/web/guide/)

1일 300,000회 무료로 사용 가능하므로 개인이나 소규모 비지니스처럼 대량으로 API 호출이 일어나지 않는 경우는 무료라고 봐도 무방하겠습니다.


- 등록한 도메인에서의 호출만 가능하므로 도메인 확인 후 등록

- JavaScript 키 사용


2. 예제 코드로 생성 - 여러개 마커 제어하기

코드 부분 복사, Static 리전 생성 후 붙여넣기


HTML 내부의 버튼 대신(코드 삭제) 별도 버튼 생성 후 이벤트 실행


<p>
    <button onclick="hideMarkers()">마커 감추기</button>
    <button onclick="showMarkers()">마커 보이기</button>
</p>


결과 화면


참고

https://apis.map.kakao.com/

https://apis.map.kakao.com/web/guide/

https://apis.map.kakao.com/web/sample/

https://juahnpop.tistory.com/254

20220413 - 나만의 도메인과 NGINX 웹 서버로 APEX 서비스 접속하기

사전 준비 : 도메인과 공용 IP 그리고 프록시 컴퓨트 인스턴스

(OS 이미지는 Oracle-Linux-7.9-aarch64-2021.10.20-0 사용)


1. root 사용자로 전환하여 최신 패키지들로 업데이트


sudo su -
yum update -y
yum install -y yum-utils


2. nginx repository 설정 후 설치


vi /etc/yum.repos.d/nginx.repo
[nginx-stable]
name=nginx stable repo
baseurl=http://nginx.org/packages/centos/$releasever/$basearch/
gpgcheck=1
enabled=1
gpgkey=https://nginx.org/keys/nginx_signing.key
module_hotfixes=true

[nginx-mainline]
name=nginx mainline repo
baseurl=http://nginx.org/packages/mainline/centos/$releasever/$basearch/
gpgcheck=1
enabled=0
gpgkey=https://nginx.org/keys/nginx_signing.key
module_hotfixes=true

yum install -y nginx


3. nginx 설치 후 상태 확인 및 서비스 시작


ps -ef | grep nginx
systemctl start nginx
systemctl status nginx
systemctl enable nginx
ps -ef | grep nginx


4. http, https 서비스를 위한 방화벽 오픈


firewall-cmd --permanent --list-all --zone=public
firewall-cmd --permanent --zone=public --add-service=http
firewall-cmd --permanent --zone=public --add-service=https
firewall-cmd --reload
firewall-cmd --permanent --list-all --zone=public


5. 해당 도메인 웹 서비스에 대한 설정


vi /etc/nginx/conf.d/oraclecloudapex.com.conf
server {
    listen         80;
    listen         [::]:80;
    server_name    oraclecloudapex.com www.oraclecloudapex.com;
    root           /usr/share/nginx/html/oraclecloudapex.com;
    index          index.html;
    try_files $uri /index.html;
}


6. 웹 서비스 기본 페이지 생성


mkdir /usr/share/nginx/html/oraclecloudapex.com
vi /usr/share/nginx/html/oraclecloudapex.com/index.html
Hello!!

nginx -s reload
nginx -t


7. (무료) SSL 인증 발급을 위한 패키지 설치 및 SSL 인증서 발급


cd /tmp
wget https://dl.fedoraproject.org/pub/epel/epel-release-latest-7.noarch.rpm
ls *.rpm
yum install -y epel-release-latest-7.noarch.rpm
yum install -y certbot python2-certbot-nginx

certbot --nginx -d oraclecloudapex.com -d www.oraclecloudapex.com --register-unsafely-without-email


8. 해당 웹 서비스 설정 파일에 APEX 서비스 고유 URL redirection 추가


vi /etc/nginx/conf.d/oraclecloudapex.com.conf
/* Adding ================>>> */
  location / {
    rewrite ^/$ /ords/f?p=xxxxx:xxxx redirect;
  }

  location /ords/ {
    proxy_pass https://yourapexserviceurl.com/ords/;
    proxy_set_header Origin "" ;
    proxy_set_header X-Forwarded-Host $host:$server_port;
    proxy_set_header X-Real-IP $remote_addr;
    proxy_set_header X-Forwarded-For $proxy_add_x_forwarded_for;
    proxy_set_header X-Forwarded-Proto $scheme;
    proxy_connect_timeout       600;
    proxy_send_timeout          600;
    proxy_read_timeout          600;
    send_timeout                600;
  }

  location /i/ {
    proxy_pass https://yourapexserviceurl.com/i/;
    proxy_set_header X-Forwarded-Host $host;
    proxy_set_header X-Real-IP $remote_addr;
    proxy_set_header X-Forwarded-For $proxy_add_x_forwarded_for;
  }


서비스 다시 로드


nginx -s reload
nginx -t


참고

테스트를 위해 최신 OL8 에 설치한 후 Gateway 에러 때문에 이틀을 맘고생 했네요.

Oracle-Linux-8.5-aarch64-2022.03.17-1

결국에는 강화된 보안 때문이었음.


vi /etc/selinux/config
SELINUX=disabled


==============

(Oracle Linux8) 7. (무료) SSL 인증 발급을 위한 패키지 설치 및 SSL 인증서 발급


cd /tmp
wget https://dl.fedoraproject.org/pub/epel/epel-release-latest-8.noarch.rpm
ls *.rpm
yum install -y epel-release-latest-8.noarch.rpm
yum install -y certbot python3-certbot-nginx

certbot --nginx -d oraclecloudapex.com -d www.oraclecloudapex.com --register-unsafely-without-email


Saving debug log to /var/log/letsencrypt/letsencrypt.log

Requesting a certificate for oraclecloudapex.com and www.oraclecloudapex.com


Successfully received certificate.

Certificate is saved at: /etc/letsencrypt/live/oraclecloudapex.com/fullchain.pem

Key is saved at:         /etc/letsencrypt/live/oraclecloudapex.com/privkey.pem

This certificate expires on 2023-12-25.

These files will be updated when the certificate renews.

Certbot has set up a scheduled task to automatically renew this certificate in the background.


Deploying certificate

Successfully deployed certificate for oraclecloudapex.com to /etc/nginx/conf.d/oraclecloudapex.com.conf

Successfully deployed certificate for www.oraclecloudapex.com to /etc/nginx/conf.d/oraclecloudapex.com.conf

Congratulations! You have successfully enabled HTTPS on https://oraclecloudapex.com and https://www.oraclecloudapex.com


- - - - - - - - - - - - - - - - - - - - - - - - - - - - - - - - - - - - - - - -

If you like Certbot, please consider supporting our work by:

 * Donating to ISRG / Let's Encrypt:   https://letsencrypt.org/donate

 * Donating to EFF:                    https://eff.org/donate-le

- - - - - - - - - - - - - - - - - - - - - - - - - - - - - - - - - - - - - - - -


20220404 - 페이지 복구 Export as of, Import

페이지를 잘못 수정하거나 했을 경우 해당 페이지를 복구할 수 있는 방법.

삭제의 경우도 가능한데 이 때는 기존 페이지 번호에 해당하는 임의의 페이지를 하나 만든 후에 Export 진행 필요.


1. 해당 페이지 Export 하고 복구 시점을 분단위로 입력

As of 에 대한 상세 설명은 하단 참조


2. Export 했던 페이지를 Import

Import할 때 해당 페이지가 이미 존재하므로 다시한 번 확인할 것을 요청 또는 백업하고 진행할 것을 권고


참고

https://apex.oracle.com/pls/apex/germancommunities/apexcommunity/tipp/5921/index-en.html


As of :


Specify a time in minutes to go to back to for your export. This option enables you to go back in time in your application, perhaps to get back a deleted object.
This utility uses the dbms_flashback package. The timestamp to SCN (system change number) mapping is refreshed approximately every 5 minutes, so you may have to wait that long to get to the version you are looking for. The time undo information is retained by the startup parameter undo_retention (default 3 hrs), but this only influences the size of the undo tablespace.
While two databases may have the same undo_retention parameter, you can go back much further in time on the database with less transactions since the transactions are not filling the undo tablespace, forcing older data to be archived.

20220327 - APEX Office Print 설치

매달 100장의 출력은 무료로 사용 가능하고 더 많은 출력이 필요하면 유료 플랜을 사용해야 함. 다운로드와 API KEY 발급을 위해서는 https://www.apexofficeprint.com/ 에 가입해야 함.


1. 해당 DB에 AOP 패키지를 컴파일


2. AOP 플러그인 임포트


3. 페이지 하나 만들어 버튼 생성 후 DA-SQL 작성


4. 실행 후 결과 확인


이렇게 pdf 출력 가능합니다.


참고

https://www.apexofficeprint.com/


Step 1: Compile the AOP package by running a script

Follow these steps to import the package in your schema:

  1. Go to SQL Workshop - SQL Scripts
  2. Click the Upload button
  3. Choose the file aop_db_pkg.sql from the directory db
  4. Click the run button and hit Run now.

Step 2: Import the AOP Plug-in

Follow these steps to import the plug-in in your application:

  1. Go to Shared Components > Plug-Ins
  2. Click Import
  3. Browse and locate the installer file (plugin/dynamic_action_plugin_be_apexrnd_aop_da.sql)
  4. Complete the wizard.

Finally modify the settings of the AOP Plug-in to point to our cloud or to your on-premise installation:

  1. Go to Shared Components > Component Settings
  2. Select APEX Office Print (AOP) [Plug-in]
  3. Specify the url, for our cloud it's http://www.apexofficeprint.com/api and add your API key which you find in your dashboard after logging in on www.apexofficeprint.com or specify your on-premise url of AOP.
    Next to specifying the AOP URL and API Key, you can also specify if you want to set the plug-in in debug mode and for the on-premise version of AOP you can also change the (PDF) Converter.
  4. Click Apply.

You should now be able to start using the AOP Plug-in, see the Use the AOP Plug-in section.


Installation note:
To use AOP you may need to configure your ACL (Active Control List) settings to allow APEX to access:
 http(s)://www.apexofficeprint.com/api
For more details please refer to the Oracle APEX installation guide.


20220310 - APEX 신규 환경으로 이사 후 이름 변경

새로운 환경으로 이사 후 애플리케이션과 페이지 이름을 변경하는 곳에 대한 기록

이렇게 두 곳이 눈에 띄게 보임

1) 페이지 표시 탭

2) 페이지 안쪽 애플리케이션 명


해당하는 페이지에 가서 페이지-제목 변경


그리고 눈에 띄지는 않지만 애플리케이션 속성에서 각 항목 변경

이름, 애플리케이션 별칭, 대체 문자, 


마지막으로 애플리케이션 사용자 인터페이스에서 로고-텍스트를 변경


참고


20220305 - 리전 디스플레이 셀렉터 활용 Region Display Selector

리전 디스플레이 셀렉터 활용하면 아주 간단하게 페이지 내에서 탭 스타일을 상세 선택 메뉴를 구성할 수 있음


1. 최상단에 리전

Region - Identification - Type : Region Display Selector


2. 그 아래로 각 조회가 될 두 개의 리전을 배치 후

Region - Region Display Selector 선택


3. 기본적으로 모두 표시라는 그룹이 보이고 이것이 선택되었을 경우는 특정 선택된 리전만 보이는 것이 아니라 전체가 보임, 안 보이게 하는 방법은 자바스크립트를 추가하여 조정.

Page - JavaScript - Execute when Page Loads :


$(".apex-rds li:first-child").remove();
$(".apex-rds li:first-child").addClass("apex-rds-first");
$(".apex-rds li:first-child").addClass("apex-rds-selected");
$(".apex-rds-container").siblings().slice(1).hide();


4. v21.2 에서는 show all 모두 보기에 대한 설정이 있음


참고


20250315 - 글로벌 변수 Global Variables

G_USER Specifies the currently logged in user. G_FLOW_ID Specifies the ID of the currently running application. G_FLOW_STEP_ID Specifi...