20220225 - 클래식 리포트 : 뱃지 템플릿 배경색 바꾸기

클래식 리포트의 뱃지 탬플릿을 사용하여 화면을 구성


1. 클래식 리포트 디자인

Identification - Title : 대기순번

Type : Classic Report

Source - Location - Local Database

Type : SQL Query

SQL Query : 


select to_number(to_char(sysdate, 'mi'))+24 "*나의 대기 순번*"
     , to_number(to_char(sysdate, 'mi'))+17 "(현재 진료중)"
  from dual


Attributes

Appearance - Template Type : Theme

Template : Badge List

Template Options : Use Template Defaults, Apply Theme Colors, 64px, Grid, 2 Column Grid, Hide when all rows displayed


2. 원하는 테마 색상으로 변경

적용했던 Theme 색상을 해제하고 원하는 테마 색상을 선택 후 DA 작성

적절한 이벤트를 찾기 못하여 Page Load 이벤트에 작성함

색상 class 확인 : https://apex.oracle.com/pls/apex/apex_pm/r/ut/color-and-status-modifiers


Page Load Event

Action

Identification - Action : Execute JavaScript Code

Setting - Code :


$(".t-BadgeList-label").each(function()
  {
    if ($(this).text() == "나의 대기 순번"){
        $(this).parent().attr('class', 't-BadgeList-wrap u-color-22');
    }
    else {
        $(this).parent().attr('class', 't-BadgeList-wrap u-color-20');
    }
  });


* 뱃지 템플릿 HTML


<li class="t-BadgeList-item">
 <span class="t-BadgeList-wrap u-color">
  <span class="t-BadgeList-label">나의 대기 순번</span>
  <span class="t-BadgeList-value">32</span>
 </span>
</li><li class="t-BadgeList-item">
 <span class="t-BadgeList-wrap u-color">
  <span class="t-BadgeList-label">(현재 진료중)</span>
  <span class="t-BadgeList-value">25</span>
 </span>
</li>


참고

https://stackoverflow.com/questions/3452778/jquery-change-class-name


Using jQuery You can set the class (regardless of what it was) by using .attr(), like this:
$("#td_id").attr('class', 'newClass');

If you want to add a class, use .addclass() instead, like this:
$("#td_id").addClass('newClass');

Or a short way to swap classes using .toggleClass():
$("#td_id").toggleClass('change_me newClass');

20220201 - 링크 파일 다운로드 (클라우드 오브젝트 스토리지)

1. 자바스크립트로 다운 받기

몇 가지 형태의 코드를 실행 해 봤지만 파일 다운로드는 되지 않고 직접 브라우저에서 창이 오픈됨.


var vPIC1 = document.getElementById("P9_PIC1").src;

//$('a#P9_PIC1').attr({target: '_blank', href : vPIC1});
//$('a#P9_PIC1').click();

/*
var element = document.createElement('a');
element.setAttribute('download', vPIC1);
element.style.display = 'none';
document.body.appendChild(element);
element.click();
document.body.removeChild(element);

const fileName = vPIC1.split('/').pop();
var el = document.createElement("a");
el.setAttribute("href", vPIC1);
el.setAttribute("download", fileName);
document.body.appendChild(el);
el.click();
el.remove();
*/


아마도 이것이 문제인듯.

In the latest versions of Chrome, you cannot download cross-origin files (they have to be hosted on the same domain)


2. 서버스크립트로 다운 받기

1) 버튼 생성

Identification - Button Name : BTN_DOWN

Behavior - Action : Defined by Dynamic Action

Dynamic Action : DA_BTN_DOWN

When - Event : Click

Selection Type : Button

아래와 같이 구현하게된 이유는 1초 간격으로 SetTimeout 지정을 위함이고 그렇게 해야 두 번째, 세 번째 파일이 다운이 진행이 됨, SetTimeout이 없는 경우에는 여러 파일이 있어도 한 번만 실행이 되는 문제가 있고. window.open 일 경우는 새 창으로 열리기 때문에 브라우저에서 새창 오픈과 닫기가 진행되어 깜빡거리는 현상이 보임.


var vPIC1, vPIC2, vPIC3, vPIC4, vPIC5, vPIC6;

var vPICID = apex.item("P9_PICID").getValue();
if (document.getElementById("P9_PIC1")) { vPIC1 = document.getElementById("P9_PIC1").src; }
if (document.getElementById("P9_PIC2")) { vPIC2 = document.getElementById("P9_PIC2").src; }
if (document.getElementById("P9_PIC3")) { vPIC3 = document.getElementById("P9_PIC3").src; }
if (document.getElementById("P9_PIC4")) { vPIC4 = document.getElementById("P9_PIC4").src; }
if (document.getElementById("P9_PIC5")) { vPIC5 = document.getElementById("P9_PIC5").src; }
if (document.getElementById("P9_PIC6")) { vPIC6 = document.getElementById("P9_PIC6").src; }

var l_url  = 'f?p=#APP_ID#:68:#SESSION#::NO:RP,68:P68_PICID,P68_PICNO:#PICID#,';

l_url = l_url.replace('#APP_ID#',  $v('pFlowId'));
l_url = l_url.replace('#SESSION#', $v('pInstance'));
l_url = l_url.replace('#PICID#',   vPICID);

if (!vPIC1) return;
apex.server.process(
    'DA-popup',
    {x01: l_url+"PIC1"},
    {success: function (pData) {
            pData = pData.replace(",this", ",'#btnOpenDialogPIC1'");
            apex.navigation.redirect(pData);
        },
        dataType: "text"
    }
);

if (!vPIC2) return;
apex.server.process(
    'DA-popup',
    {x01: l_url+"PIC2"},
    {success: function (pData) {
            pData = pData.replace(",this", ",'#btnOpenDialogPIC2'");
            setTimeout(function() {
              apex.navigation.redirect(pData);
            }, 1000);
        },
        dataType: "text"
    }
);

...
...
...

if (!vPIC6) return;
apex.server.process(
    'DA-popup',
    {x01: l_url+"PIC6"},
    {success: function (pData) {
            pData = pData.replace(",this", ",'#btnOpenDialogPIC6'");
            setTimeout(function() {
              apex.navigation.redirect(pData);
            }, 5000);
        },
        dataType: "text"
    }
);


2) Page 68

Pre-Rendering - Before Header Processes

Identification - Name : DownloadObject

Type : Execute Code

Source - Location : Local Database

Language : PL/SQL


declare
  l_request_url varchar2(32767);
  l_content_type varchar2(32767);
  l_content_length varchar2(32767);

  l_response blob;
  l_filename varchar2(1000);

  download_failed_exception exception;
begin

  for c1 in (select decode(:P68_PICNO, 'PIC1', pic1, 'PIC2', pic2, 'PIC3', pic3, 'PIC4', pic4, 'PIC5', pic5, 'PIC6', pic6) pic 
               from po_mst_pic where pic_id = :P68_PICID)
  loop
    
    l_request_url := c1.pic;
    l_filename := substr(l_request_url, instr(l_request_url, '/', -1)+1);

    apex_web_service.g_request_headers.delete();
    l_response := apex_web_service.make_rest_request_b(
      p_url => l_request_url
      , p_http_method => 'GET'
    );

    if apex_web_service.g_status_code != 200 then raise download_failed_exception; end if;

    for i in 1..apex_web_service.g_headers.count
    loop
      if apex_web_service.g_headers(i).name = 'Content-Length' then
        l_content_length := apex_web_service.g_headers(i).value;
      end if;

      if apex_web_service.g_headers(i).name = 'Content-Type' then
        l_content_type := apex_web_service.g_headers(i).value;
      end if;
    end loop;

    sys.htp.init;
    if l_content_type is not null then
      sys.owa_util.mime_header(trim(l_content_type), false);
    end if;

    sys.htp.p('Content-length: ' || l_content_length);
    sys.htp.p('Content-Disposition: attachment; filename="' || l_filename || '"' );
    sys.htp.p('Cache-Control: max-age=3600'); -- if desired
    sys.owa_util.http_header_close;
    sys.wpg_docload.download_file(l_response);
    apex_application.stop_apex_engine;
    
  end loop;
end;


참고

https://gomakethings.com/how-to-force-a-file-to-download-instead-of-open-in-the-browser-using-only-html/

20220129 - Rest API 카카오톡 메세지 서비스 연결

1. 계정 가입 + 개발자 등록

https://developers.kakao.com/


2. 앱 만들기(=API 키 얻기)


3. 인가코드 받기 + 토큰 받기

인가 코드 받기는 카카오 로그인을 시작하는 단계로써, 카카오 로그인 동의 화면을 호출하고, 사용자 동의를 거쳐 인가 코드 발급을 요청하는 API입니다. 동의 화면은 [내 애플리케이션] > [카카오 로그인] > [동의 항목]의 설정을 반영합니다.

이 기능은 웹 브라우저에 로그인한 카카오계정 세션이 존재하는지에 따라 사용자 동선이 다릅니다. 웹 브라우저에 카카오계정 세션이 없다면, 사용자는 카카오계정 정보를 입력하거나 카카오톡으로 로그인하는 인증 과정을 거쳐 동의 항목 확인 화면을 보게 되고, 카카오계정 세션이 있는 상태라면 곧바로 동의 화면을 보게 됩니다.

인가 코드를 받은 뒤, 인가 코드로 액세스 토큰과 리프레시 토큰을 발급받는 API입니다. 인가 코드 받기만으로는 카카오 로그인이 완료되지 않으며, 토큰 받기까지 마쳐야 카카오 로그인을 정상적으로 완료할 수 있습니다.


인가코드 받기


https://kauth.kakao.com/oauth/authorize?response_type=code&client_id={REST_API_KEY}&redirect_uri={REDIRECT_URI}


위와 같은 형식으로 버튼에 셋업

Behavior - Action - Redirect to URL


로그인이 안 되어 있으며 로그인 페이지를, 로그인이 되어 있으면 바로 동의 페이지를 보여줌


토큰받기

예제


curl -v -X POST "https://kauth.kakao.com/oauth/token" \
 -H "Content-Type: application/x-www-form-urlencoded" \
 -d "grant_type=authorization_code" \
 -d "client_id={REST_API_KEY}" \
 --data-urlencode "redirect_uri={REDIRECT_URI}" \
 -d "code={AUTHORIZE_CODE}"


참고

https://developers.kakao.com/docs/latest/ko/kakaologin/rest-api#request-code

https://ai-creator.tistory.com/170

https://docs.oracle.com/en/database/oracle/application-express/21.2/aeapi/GET_T_NUMBER-Function.html#GUID-4E16284C-7C85-42EE-8DD3-FD8B556200EE

https://docs.oracle.com/en/database/oracle/application-express/21.2/aeapi/JOIN-Function-Signature-1.html#GUID-C7904CB2-C420-441D-9B5F-C7C33D7804CC


20220113 - 챠트에서 특정 데이터 선택 후 다른 리전 조회

1. 챠트의 시리즈 선택

Link - Type : Redirect to URL

javascript:apex.item('P7_QTR').setValue('&QT.');apex.item('P7_CTE').setValue('&CTYPE.');


2. 해당 아이템 변경 시 다른 리전 조회 Dynamic Action

Identification - Name : DA_CHG_ITEM

When -

Event : Change

Selection Type : Item

Item : P7_QTR,P7_CTE


Identification - Action : Refresh

Affected Elements - Selection Type : Region

Region : IR2


참고

https://seanstuber.com/2021/03/21/dynamic-action-link-with-apex-chart/

20220112 - 세션 타임 아웃 관리

APEX 관리자 서비스로 로그인하여 Manage Instance >> Security


1. 최대 세션 실행 길이(초단위) : 기본 28800

2. 최대 세션 휴지 길이(초단위) : 기본 3600

3. 세션 타임아웃 경고(초단위) : 기본 180


참고

https://docs.oracle.com/en/database/oracle/application-express/21.2/aeadm/configuiring-session-timeout.html

https://blog.cloudnueva.com/all-about-apex-timeouts

20220111 - 글로벌 변수 Global Variables

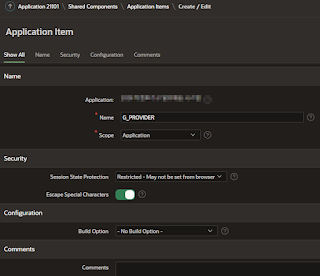
1. Application Item 생성

Shared Components - Application Items


2. 로그인 인증 함수에 변수 셋팅 추가

F_AUTHENTICATE_USER


    -- Compare the two, and if there is a match, return TRUE
    if l_hashed_password = l_password then
        -- Good result. 
        APEX_UTIL.SET_AUTHENTICATION_RESULT(0);
        APEX_UTIL.SET_SESSION_STATE('G_PROVIDER', l_provider);
        return true;
    else
        -- The Passwords didn't match
        APEX_UTIL.SET_AUTHENTICATION_RESULT(4);
        return false;
    end if;


3. 각 페이지에서 앞서 생성한 글로벌 변수 Application Item 호출

Page Item - Default

Type : Function Body

Language : PL/SQL

PL/SQL Function Body : return v('G_PROVIDER')


참고

https://orclqa.com/question/how-to-create-and-use-global-variables-accross-applications-in-oracle-apex/

https://docs.oracle.com/en/database/oracle/application-express/21.2/aeapi/APEX_APPLICATION-Global-Variables.html#GUID-5164592B-6864-4E2B-8DE3-64B463687A41 

https://docs.oracle.com/en/database/oracle/application-express/20.1/htmdb/understanding-substitution-strings.html#GUID-3AFC7346-902C-4DCA-8D28-960BD8FC6628

20220103 - 확인 메세지 창 띄우기 (Confirmation Message)

1. 계획과 문제

배송출발 버튼 클릭시 PL/SQL로 상태값 업데이트 전에 Javascript에서 확인 메세지 이후 처리 여부를 진행, 하지만 Confirm 확인 메세지를 기다려주지 않고 PL/SQL까지 모두 실행되어버리는 문제 발생


Execute JavaScript Code


apex.message.confirm("'배송출발' 하시겠습니까?", function( okPressed ) { 
if( okPressed ) {
   return true;
} else {
   return false;
}
});


Execute Server-side Code


begin
  update po_mst 
     set proc_type = '71' 
   where nvl2(po_odgrp_id, po_odgrp_id, nvl2(po_grp_id, po_grp_id, po_id)) = nvl2(po_odgrp_id, :P62_PO_ODGRP_ID, nvl2(po_grp_id, :P62_PO_GRP_ID, :P62_PO_ID));
end;


2. 대안 - 조금 덜 이쁘지만 apex.message.confirm 대신 기본 confirm 사용


return confirm("'배송출발'하시겠습니까?");

이렇게 하면 이후 PL/SQL 자동 실행을 제어할 수 있음.


참고

https://doyensys.com/blogs/adding-dialog-confirmation-alert-in-oracle-apex-using-javascript/

https://www.traust.com/oracle-apex-js-confirm-and-pl-sql-dynamic-action/


20250315 - 글로벌 변수 Global Variables

G_USER Specifies the currently logged in user. G_FLOW_ID Specifies the ID of the currently running application. G_FLOW_STEP_ID Specifi...